

Prerequisites
You must have a valid HubSpot account and access to the settings of your Hyperline account. Use a test account to test the integration before going live. You can create a free HubSpot account and use the test mode of your Hyperline account during setup and testing.Embedded Hyperline UIs in HubSpot
Installation
Upon connecting your HubSpot account to Hyperline, Hyperline automatically adds the Hyperline billing card to your HubSpot account. This card appears on your company and deal pages. Your revenue teams can keep using HubSpot while accessing all Hyperline functionalities.If the card isn’t added automatically, you can add it manually. Open a company or deal record page and go to Customize > Default view (or any view) > Edit layout. In the right panel, hover over an existing card to reveal the option to add a new one. Select Hyperline and save your changes.
Cards
Billing card
Once installed, you can use the billing card on company, contact, and deal pages (right side panel). You can:- Create Hyperline quotes.
- Create Hyperline subscriptions.
- Manage the linked Hyperline customer.
Settings
You can configure the billing card from Settings > Integrations > HubSpot.Root object
Controls which HubSpot object the billing card treats as the source of truth when displaying Hyperline billing data (quotes and subscriptions). Two modes are available:- Company: All quotes and subscriptions of a company are displayed on both the company card and the cards of its related deals. Select this option if your revenue team thinks about billing at the customer level and wants the full billing picture available from any deal tied to that customer.
- Deal: Only the quotes and subscriptions attached to a specific deal are displayed on that deal’s card. The company card still shows all of the company’s quotes and subscriptions. Select this option if you want each deal to surface only its own billing items, with no cross-deal bleed.
Allow creating new customer
When enabled, a HubSpot user can trigger an action from a company or deal that isn’t yet linked to a Hyperline customer. The user can then create the corresponding Hyperline customer on the fly and proceed with the action. When disabled, actions are blocked until a matching Hyperline customer exists and is linked to the HubSpot record.Display customers’ children’s data
When enabled, the billing card also displays quotes and subscriptions belonging to the customer’s children (in Hyperline’s parent–child customer hierarchy), in addition to the customer’s own. This is useful when you bill parent accounts but want visibility into activity across their subsidiaries from the parent’s HubSpot record.Customer intelligence card
The Customer intelligence card lets you review the linked Hyperline customer’s latest monitoring result directly from the sidebar of a HubSpot company, contact, or deal record. It is a separate card from the Hyperline billing card. To add it to a record view:- Open a company, contact, or deal record and go to Customize > Default view (or the view you want to edit) > Edit layout.
- Add the Customer intelligence card to the right sidebar and save your changes.
- Health score: The customer’s score out of 100, with a color indicating their health tier.
- Summary: A summary of the customer monitoring analysis.
- Last run: The date of the latest monitoring result.
pending, running, or failed, or indicates that no run exists yet.
Monitoring requires the Customer Intelligence paid add-on and a customer monitoring agent. The CRM record must be linked to a Hyperline customer using the reconciliation rules below, and your Hyperline role must allow you to view customers. If prompted, use Link customer to associate the record with a Hyperline customer.
User access
You control how HubSpot users get access to Hyperline with the Automatically register users toggle in the User access section of Settings > Integrations > HubSpot.- Enabled: HubSpot users do not need an existing Hyperline account. When a user triggers a Hyperline action for the first time, Hyperline automatically creates a corresponding Hyperline user with their HubSpot email address. Hyperline assigns this user to your default Hyperline role (the ‘Account manager’ role if not changed).
- Disabled: Hyperline does not create users from HubSpot activity. Only HubSpot users who are already members of your Hyperline workspace can access Hyperline interfaces in HubSpot. Invite users before they use the integration.
@) on any of these domains. For example, with acme.com and acme.io configured, jane@acme.io in HubSpot matches the existing Hyperline user jane@acme.com. These domains are read-only in the settings. Contact support to change them.
When Hyperline interfaces open inside HubSpot, Hyperline applies the user’s Hyperline role to ensure the correct view and edit permissions. You manage these permissions directly in Hyperline under Settings > Team.
Data reconciliation
Hyperline first determines which HubSpot record represents the customer. It then reconciles that record with a Hyperline customer.
For deals, Hyperline checks for an associated company first. It uses an associated contact only when no company is available. The deal identifies the sales opportunity but is not reconciled directly with a Hyperline customer.
The Root object setting does not change this lookup order. It controls which quotes and subscriptions the billing card displays after Hyperline identifies the customer.
- If the HubSpot record is already linked to a Hyperline customer through the Integrations section of the customer page, Hyperline uses that customer.
- If the record has a value in the Hyperline customer ID property, Hyperline looks for the corresponding customer.
- If the record has a value in the Hyperline external ID property, Hyperline looks for a customer whose ID or external ID matches that value. It also checks for a customer whose linked Stripe customer ID matches that value (for example, a customer imported from Stripe).
Data synchronization
The integration can also synchronize data from Hyperline to HubSpot custom objects. This synchronization is optional, and you can configure it afterward.Data synchronization with custom objects is only available for HubSpot companies and not for contacts.
Prerequisites
To synchronize data, Hyperline requires specific custom objects to exist in your HubSpot account. Hyperline does not have permission to automatically create custom objects in your HubSpot account. You must create them manually using the object internal names listed below. If a required custom object does not exist, you can’t activate synchronization for that entity. Hyperline does not push any data to HubSpot for it.Custom objects are available only on the HubSpot Enterprise plan.
For more details, see the HubSpot documentation.
Create a custom object in HubSpot
Create a custom object in HubSpot
To create the required custom objects:
- Click the Gear icon (top-right corner).
- Go to Data Management > Objects > Custom Objects.
- Click the Create Custom Object button.
- Enter the object details. Hyperline requires the Internal name to match one of the names listed in the table above. You may customize the display name as you prefer.
- Repeat this process for each object you want to synchronize.
Object
Internal name must match the required name (HubSpot object internal name) listed above.Each custom object must include a mandatory name field of type text.Example
Example
The red sections must match the requirements; otherwise, the integration will fail.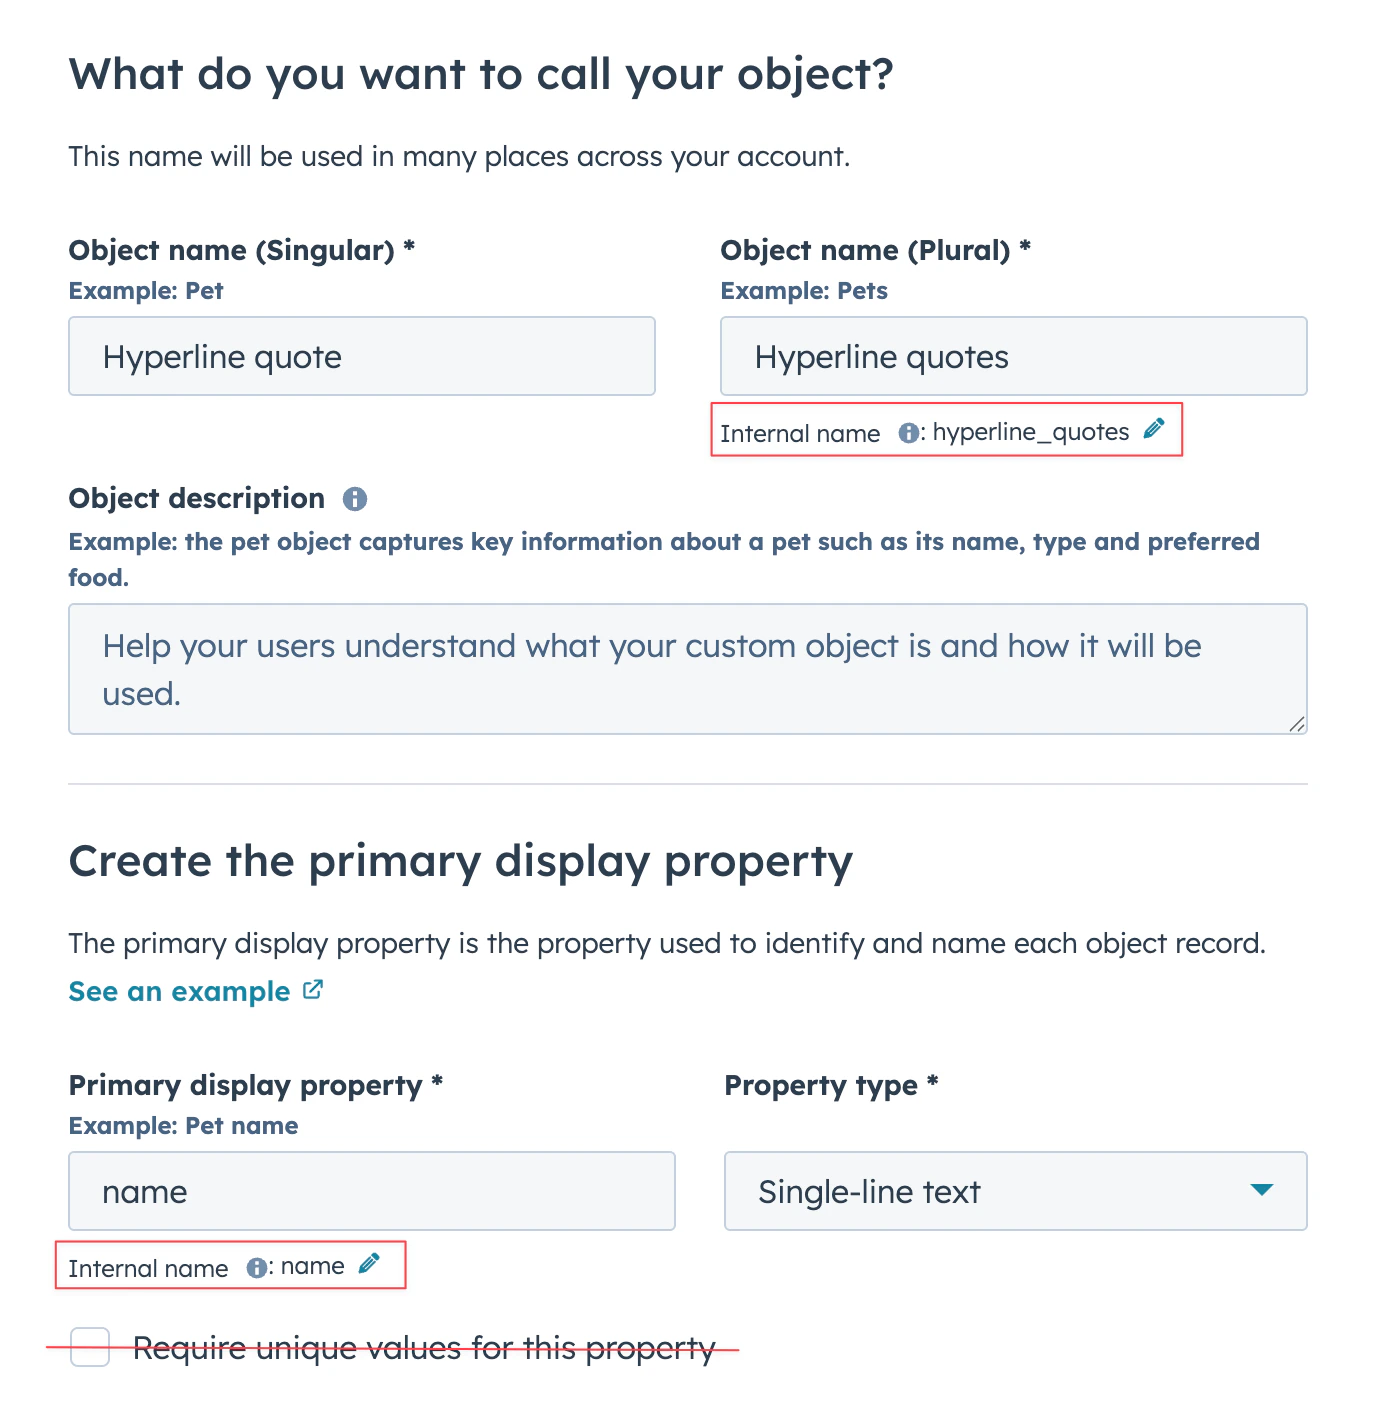
Create only the custom objects required for the entities you want to synchronize.
Mapping
Below are the default field mappings between Hyperline entities and HubSpot objects.Field mappings
Field mappings

Customer sync
When enabled, Hyperline synchronizes customers with HubSpot companies. You can select the synchronization direction (one-way or bidirectional). During the integration setup, Hyperline creates a (Hyperline) Synchronize checkbox custom field (hyperline_sync slug) on the Company object.
Hyperline imports and synchronizes a HubSpot company only when this checkbox is enabled. Hyperline ignores companies without it checked.
Customer custom properties
Customer custom properties use different paths for inbound and outbound synchronization:- From HubSpot company properties to Hyperline: Create a property on the HubSpot Company object whose internal name exactly matches the Hyperline custom property
slug. When you synchronize customers from HubSpot, Hyperline imports this value into the matching existing customer custom property. Changes in Hyperline do not update this HubSpot property. - From Hyperline to custom property value records: Enable Custom property values in the integration settings. Hyperline creates one record in the
hyperline_custom_property_valuescustom object for each value and associates customer values with the related HubSpot company. This option also keeps each property’s name, type, and value available as separate fields.
Example 💡
If a Hyperline customer custom property uses the
customer_tier slug, create
a HubSpot company property with customer_tier as its internal name. Set its
value in HubSpot to import it into Hyperline when the customer syncs.The matching HubSpot company property must already exist, and the integration must be able to read it.
Hyperline does not create it automatically. Synchronizing values through the
custom object requires HubSpot Enterprise and the
hyperline_custom_property_values object described above.Turn customer fields on or off
You can choose which default customer fields Hyperline syncs. To stop syncing specific fields, for example if you manage the currency or billing address only in HubSpot, configure the customer field mappings.- In the HubSpot integration settings, go to the customer synchronization section.
- Click Configure field mappings.
- In the Customer field mappings modal, use the toggle next to each field to turn its sync on or off. Each field shows its fixed HubSpot destination (company property) below its name.
- Click Save changes.
You can’t turn off fields that Hyperline needs to identify and link customers. Their toggles are locked. Creating new customers may still require some fields to be synced.
Quote sync
When Quotes is enabled, Hyperline pushes quotes to thehyperline_quotes custom object. You can also enable Quotes line items, Quotes coupons, Quotes phases, and Quotes files to push the related data to their own custom objects, associated with the quote.
Hyperline syncs line items and coupons only for subscription quotes (new subscriptions and subscription updates). One-off quotes don’t sync line items or coupons.
Products and line items
Each active product of the quote’s subscription becomes a quote line item record in HubSpot. Hyperline doesn’t sync products removed from the subscription. Which products and coupons Hyperline syncs depends on the Quotes phases setting:- Quotes phases enabled: Hyperline syncs the products and coupons of every phase of the quote. Hyperline associates each line item and coupon with its quote phase record in HubSpot.
- Quotes phases disabled: Hyperline only syncs the products and coupons of the first phase. Hyperline doesn’t push products and coupons from later phases to HubSpot.
Example 💡
A quote includes two phases: a 3-month ramp-up phase at a discounted price,
followed by a 12-month phase at the full price. With Quotes phases
disabled, HubSpot only receives the line items and coupons of the ramp-up
phase. Enable Quotes phases to get the line items and coupons of both
phases.
Manually trigger a sync
You can also manually trigger customer data synchronization from the Hyperline customer page. In the Integrations dropdown, click Sync with HubSpot to push (or pull, depending on the sync direction) the customer’s data. Hyperline also sends all associated quotes, subscriptions, and invoices to HubSpot.Custom workflows
Beyond the built-in synchronization, you can build your own automations in HubSpot by reacting to Hyperline webhooks. A few examples of what this unlocks:- Update HubSpot deal fields (stage, close date, amount, custom properties) when a Hyperline quote is signed or voided.
- Compute and write custom metrics (ARR, MRR, committed amount, contract length) on the company or deal once a subscription is activated or renewed.
- Trigger HubSpot tasks, internal notifications, or Slack alerts when an invoice becomes late or a subscription is cancelled.
- Move deals along your pipeline when subscription contracts start, renew, or expire.
How it works
- In Hyperline, create a webhook endpoint in Settings > Webhooks and subscribe to the events you care about (e.g.
quote.signed,subscription.activated,subscription.contract_renewed,invoice.settled). See the full list in the Webhooks reference. - In HubSpot, expose an endpoint that receives the Hyperline payload. The most common patterns are:
- A HubSpot workflow webhook trigger: use the Hyperline event to start a workflow that updates fields, sends notifications, or branches based on payload data.
- A custom-coded action (HubSpot Operations Hub) or an external service (Zapier, n8n, your own backend) that calls the HubSpot API to update the relevant company or deal.
- Use the Hyperline customer ID or HubSpot company ID from the webhook payload to resolve the correct HubSpot record, then apply your business logic.
Hyperline webhooks are signed. Verify the signature before acting on a payload. Details are in the Webhooks reference.
Troubleshooting
If data is missing or synchronization fails, open Settings > Integrations > HubSpot > View issues in Hyperline for details.Common issues
Embedded Hyperline views don’t load, or an action loads forever This happens when your browser blocks third-party cookies, which Hyperline needs to authenticate the embedded view inside your CRM. Allow third-party cookies for[*.]hyperline.co, then reload the page:
Browsers block links to settings pages, so the addresses below aren’t
clickable. Copy the address and paste it into a new browser tab.
- Chrome / Arc: open
chrome://settings/cookies, then under “Sites allowed to use third-party cookies” add[*.]hyperline.co(or select “Allow all cookies”). See Google’s guide. - Edge: open
edge://settings/content/cookiesand add[*.]hyperline.counder “Allow”. See Microsoft’s guide. - Safari: open Settings > Privacy and uncheck “Prevent cross-site tracking”. See Apple’s guide.
- Firefox: click the shield icon in the address bar and turn off “Enhanced Tracking Protection” for this site, or add an exception under Settings > Privacy & Security. See Mozilla’s guide.