> ## Documentation Index
> Fetch the complete documentation index at: https://docs.hyperline.co/llms.txt
> Use this file to discover all available pages before exploring further.
# Webhooks
> Receive webhook messages from Hyperline for entity events and user-triggered custom actions, with signing, delivery, and retry guidance.
Webhooks are automated messages that Hyperline sends when something happens in your account. Each webhook has a specific payload for the action it notifies. Hyperline sends it to a unique URL: an HTTPS endpoint on your server. Webhooks are a great way to integrate your application with Hyperline. You can fine-tune product flows and build deeper integrations based on your needs, with little development work on your end.
## Add a webhook endpoint
To start listening to webhook messages sent by Hyperline, go to your [webhooks settings](https://app.hyperline.co/app/settings/webhooks) in the app and click **Add Endpoint**. Provide the termination URL that you control, and select the event types you want to listen to. To separate the events you listen to, you can add as many URLs as you want.
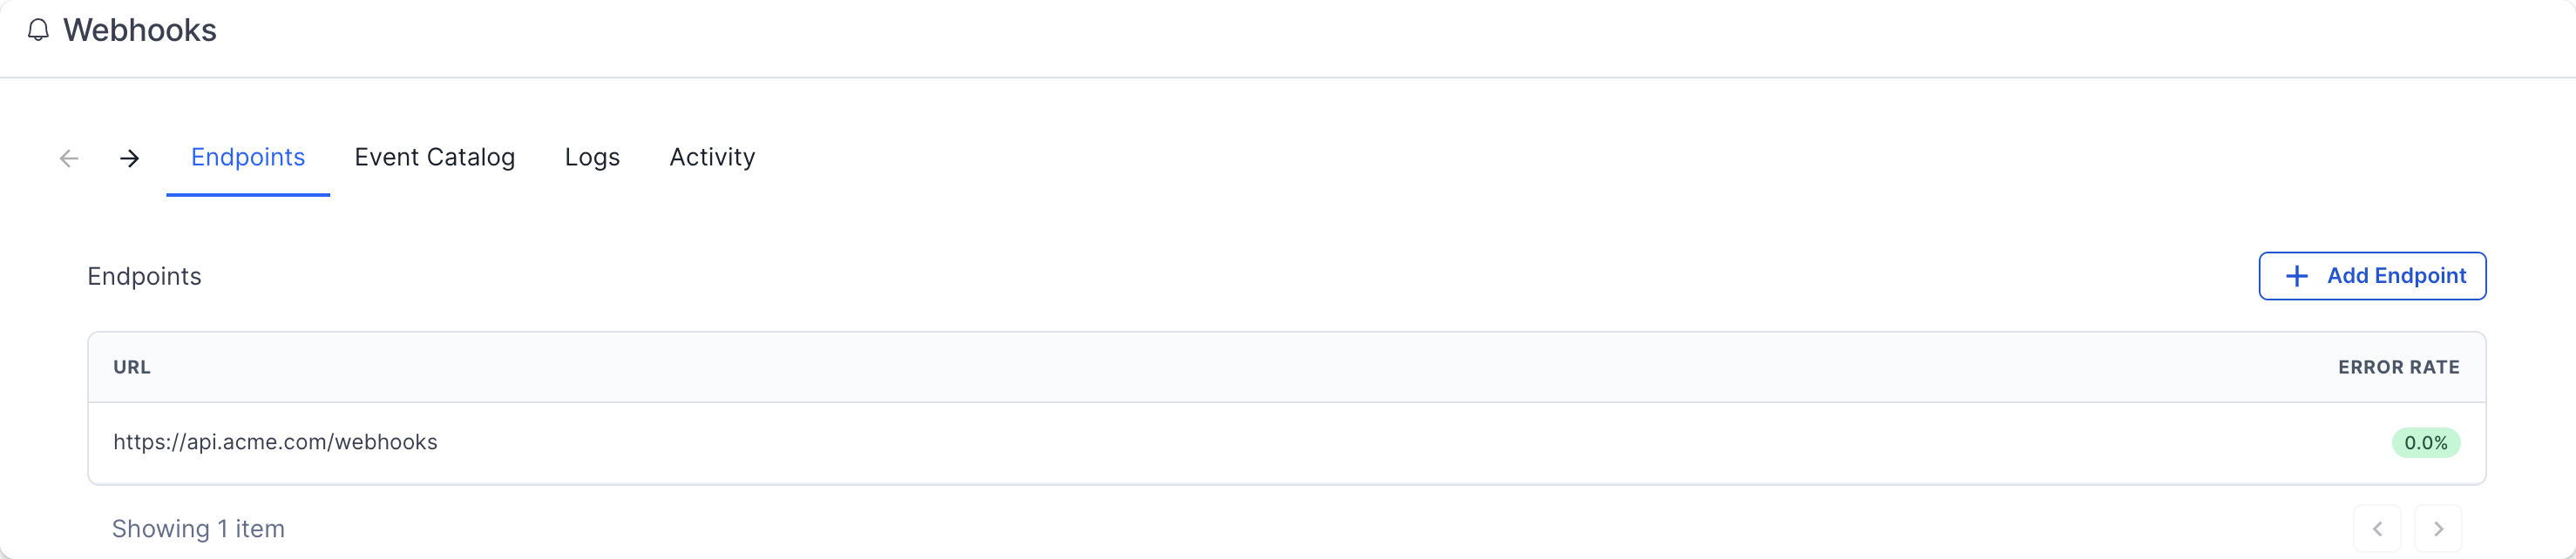 Hyperline now sends webhook calls to your endpoint when the selected events occur.
## Event types
You can find a complete list of the event types and the shape of the event
payload in the product Webhooks page, on the **Event Catalog** tab.
Here is a preview of the events Hyperline can notify you about:
* `customer.created`, `customer.updated`, `customer.archived`, `customer.recovered`, `customer.deleted`
* `subscription.created`, `subscription.trial_ended`, `subscription.activated`, `subscription.reactivated`, `subscription.contract_started`, `subscription.contract_renewed`, `subscription.paused`, `subscription.phase_activated`, `subscription.updated`, `subscription.cancellation_scheduled`, `subscription.cancelled`, `subscription.voided`, `subscription.errored`, `subscription.charged`, `subscription.commitment_renewed`, `subscription.reinstated`, `subscription.analytics_updated`
* `subscription_transition.completed`
* `invoice.created`, `invoice.grace_period.started`, `invoice.late`, `invoice.ready`, `invoice.reminder_sent`, `invoice.settled`, `invoice.errored`, `invoice.chargeback`, `invoice.voided`, `invoice.uncollectible`, `invoice.deleted`
* `invoice.batch.creation_succeeded`, `invoice.batch.creation_failed`
* `credit_note.ready`, `credit_note.settled`, `credit_note.voided`
* `checkout.created`, `checkout.completed`
* `payment_method.created`, `payment_method.activated`, `payment_method.errored`, `payment_method.deleted`, `payment_method.expiring_soon`, `payment_method.expired`
* `wallet.credited`, `wallet.debited`, `wallet.low_projected_balance`
* `credit.created`, `credit.updated`, `credit.balance_refreshed`, `credit.low_balance`, `credit.balance_at_zero`, `credit.topup_transaction_created`, `credit.usage_transaction_created`, `credit.expiration_transaction_created`
* `quote.created`, `quote.updated`, `quote.approval_requested`, `quote.approved`, `quote.sent`, `quote.viewed`, `quote.signed`, `quote.voided`
* `bank_account.created`, `bank_account.deleted`, `bank_account.errored`
* `custom_property.created`, `custom_property.updated`, `custom_property.deleted`, `custom_property.value_created`, `custom_property.value_updated`
* `product.created`, `product.updated`, `product.archived`, `product.recovered`, `product.deleted`
* `plan.created`, `plan.updated`, `plan.deleted`
* `coupon.created`, `coupon.updated`, `coupon.deleted`
* `pricebook.created`, `pricebook.updated`, `pricebook.deleted`
* `approval_workflow.created`, `approval_workflow.updated`, `approval_workflow.deleted`
* `approval_request.created`, `approval_request.step_approved`, `approval_request.step_rejected`, `approval_request.approved`, `approval_request.rejected`, `approval_request.cancelled`
* `daily_analytics.ready`
* `dataloader.failed`
* `aggregator.updated`, `aggregator.threshold_crossed`
* `event.price_calculated`
* `agent.run.completed`
* `custom_action`
## Trigger webhooks with custom actions
Custom actions let your team trigger webhook-backed workflows directly from customer, invoice, quote, and subscription pages. An action appears at the top of the pages you select and sends a `custom_action` event when a user clicks it.
### Create a custom action
1. Go to [**Settings** → **Developers** → **Custom actions**](https://app.hyperline.co/app/settings/custom-actions).
2. Click **Add action**.
3. Enter a **Name**. This label appears on the action button.
4. Enter a **Type**. This stable slug identifies the action in the webhook payload as `custom_action_type` and can contain lowercase letters, numbers, and underscores.
5. Select an **Icon**.
6. Select one or more **Entities**: customers, invoices, quotes, or subscriptions.
7. Select where the action appears: **Overview pages**, **Form pages**, or both.
8. Click **Save changes**.
A custom action configured for form pages appears only after the entity has
been created, such as after a draft quote or subscription exists.
When one action is available on a page, Hyperline displays it as a button. When several actions are available, Hyperline groups them in a **Custom actions** dropdown. You can rename this dropdown for your entire workspace under **Dropdown** on the custom actions settings page.
Choose a descriptive **Type**, such as `sync_quote` or `send_to_erp`, and
avoid changing it after connecting your webhook automation.
### Receive custom action events
Configure your webhook endpoint to listen for the `custom_action` event type. Hyperline sends the following payload when a user triggers an action:
```json theme={null}
{
"event_type": "custom_action",
"data": {
"custom_action_type": "sync_quote",
"origin_entity": "quote",
"origin_entity_id": "quo_2xY7kP9mQ4rT8v",
"triggered_at": "2026-08-12T19:47:43.000Z",
"triggered_by": "usr_8hK3mN5pR2sV6w",
"triggered_from": "https://app.hyperline.co/app/quoting/quotes/quo_2xY7kP9mQ4rT8v"
}
}
```
| Field | Description |
| - | - |
| `custom_action_type` | The **Type** configured for the custom action. Use it to route the event to the correct workflow. |
| `origin_entity` | The entity where the action was triggered: `customer`, `invoice`, `quote`, or `subscription`. |
| `origin_entity_id` | The ID of that entity. |
| `triggered_at` | The ISO 8601 timestamp when the user clicked the action. |
| `triggered_by` | The ID of the Hyperline user who clicked the action. |
| `triggered_from` | The URL of the page where the action was triggered. |
Checkout sessions do not expire automatically, so Hyperline does not emit a `checkout.expired` event. A checkout remains open until it is completed, cancelled, or errored.
## Consuming webhooks
Webhook calls are always `POST` HTTPS requests containing a JSON body with this format:
```json theme={null}
{
"event_type": ".",
"data": {}
}
```
Your endpoint must quickly return a 2xx (status code 200-299) response prior to any complex logic that could cause a timeout (max 15s).
Another important aspect of handling webhooks is to verify the signature and timestamp when processing them.
## Testing events
The easiest way to be more confident in your endpoint configuration is to start receiving events as quickly as possible. Use the **Testing** tab to send example events to your endpoint.
Hyperline now sends webhook calls to your endpoint when the selected events occur.
## Event types
You can find a complete list of the event types and the shape of the event
payload in the product Webhooks page, on the **Event Catalog** tab.
Here is a preview of the events Hyperline can notify you about:
* `customer.created`, `customer.updated`, `customer.archived`, `customer.recovered`, `customer.deleted`
* `subscription.created`, `subscription.trial_ended`, `subscription.activated`, `subscription.reactivated`, `subscription.contract_started`, `subscription.contract_renewed`, `subscription.paused`, `subscription.phase_activated`, `subscription.updated`, `subscription.cancellation_scheduled`, `subscription.cancelled`, `subscription.voided`, `subscription.errored`, `subscription.charged`, `subscription.commitment_renewed`, `subscription.reinstated`, `subscription.analytics_updated`
* `subscription_transition.completed`
* `invoice.created`, `invoice.grace_period.started`, `invoice.late`, `invoice.ready`, `invoice.reminder_sent`, `invoice.settled`, `invoice.errored`, `invoice.chargeback`, `invoice.voided`, `invoice.uncollectible`, `invoice.deleted`
* `invoice.batch.creation_succeeded`, `invoice.batch.creation_failed`
* `credit_note.ready`, `credit_note.settled`, `credit_note.voided`
* `checkout.created`, `checkout.completed`
* `payment_method.created`, `payment_method.activated`, `payment_method.errored`, `payment_method.deleted`, `payment_method.expiring_soon`, `payment_method.expired`
* `wallet.credited`, `wallet.debited`, `wallet.low_projected_balance`
* `credit.created`, `credit.updated`, `credit.balance_refreshed`, `credit.low_balance`, `credit.balance_at_zero`, `credit.topup_transaction_created`, `credit.usage_transaction_created`, `credit.expiration_transaction_created`
* `quote.created`, `quote.updated`, `quote.approval_requested`, `quote.approved`, `quote.sent`, `quote.viewed`, `quote.signed`, `quote.voided`
* `bank_account.created`, `bank_account.deleted`, `bank_account.errored`
* `custom_property.created`, `custom_property.updated`, `custom_property.deleted`, `custom_property.value_created`, `custom_property.value_updated`
* `product.created`, `product.updated`, `product.archived`, `product.recovered`, `product.deleted`
* `plan.created`, `plan.updated`, `plan.deleted`
* `coupon.created`, `coupon.updated`, `coupon.deleted`
* `pricebook.created`, `pricebook.updated`, `pricebook.deleted`
* `approval_workflow.created`, `approval_workflow.updated`, `approval_workflow.deleted`
* `approval_request.created`, `approval_request.step_approved`, `approval_request.step_rejected`, `approval_request.approved`, `approval_request.rejected`, `approval_request.cancelled`
* `daily_analytics.ready`
* `dataloader.failed`
* `aggregator.updated`, `aggregator.threshold_crossed`
* `event.price_calculated`
* `agent.run.completed`
* `custom_action`
## Trigger webhooks with custom actions
Custom actions let your team trigger webhook-backed workflows directly from customer, invoice, quote, and subscription pages. An action appears at the top of the pages you select and sends a `custom_action` event when a user clicks it.
### Create a custom action
1. Go to [**Settings** → **Developers** → **Custom actions**](https://app.hyperline.co/app/settings/custom-actions).
2. Click **Add action**.
3. Enter a **Name**. This label appears on the action button.
4. Enter a **Type**. This stable slug identifies the action in the webhook payload as `custom_action_type` and can contain lowercase letters, numbers, and underscores.
5. Select an **Icon**.
6. Select one or more **Entities**: customers, invoices, quotes, or subscriptions.
7. Select where the action appears: **Overview pages**, **Form pages**, or both.
8. Click **Save changes**.
A custom action configured for form pages appears only after the entity has
been created, such as after a draft quote or subscription exists.
When one action is available on a page, Hyperline displays it as a button. When several actions are available, Hyperline groups them in a **Custom actions** dropdown. You can rename this dropdown for your entire workspace under **Dropdown** on the custom actions settings page.
Choose a descriptive **Type**, such as `sync_quote` or `send_to_erp`, and
avoid changing it after connecting your webhook automation.
### Receive custom action events
Configure your webhook endpoint to listen for the `custom_action` event type. Hyperline sends the following payload when a user triggers an action:
```json theme={null}
{
"event_type": "custom_action",
"data": {
"custom_action_type": "sync_quote",
"origin_entity": "quote",
"origin_entity_id": "quo_2xY7kP9mQ4rT8v",
"triggered_at": "2026-08-12T19:47:43.000Z",
"triggered_by": "usr_8hK3mN5pR2sV6w",
"triggered_from": "https://app.hyperline.co/app/quoting/quotes/quo_2xY7kP9mQ4rT8v"
}
}
```
| Field | Description |
| - | - |
| `custom_action_type` | The **Type** configured for the custom action. Use it to route the event to the correct workflow. |
| `origin_entity` | The entity where the action was triggered: `customer`, `invoice`, `quote`, or `subscription`. |
| `origin_entity_id` | The ID of that entity. |
| `triggered_at` | The ISO 8601 timestamp when the user clicked the action. |
| `triggered_by` | The ID of the Hyperline user who clicked the action. |
| `triggered_from` | The URL of the page where the action was triggered. |
Checkout sessions do not expire automatically, so Hyperline does not emit a `checkout.expired` event. A checkout remains open until it is completed, cancelled, or errored.
## Consuming webhooks
Webhook calls are always `POST` HTTPS requests containing a JSON body with this format:
```json theme={null}
{
"event_type": ".",
"data": {}
}
```
Your endpoint must quickly return a 2xx (status code 200-299) response prior to any complex logic that could cause a timeout (max 15s).
Another important aspect of handling webhooks is to verify the signature and timestamp when processing them.
## Testing events
The easiest way to be more confident in your endpoint configuration is to start receiving events as quickly as possible. Use the **Testing** tab to send example events to your endpoint.
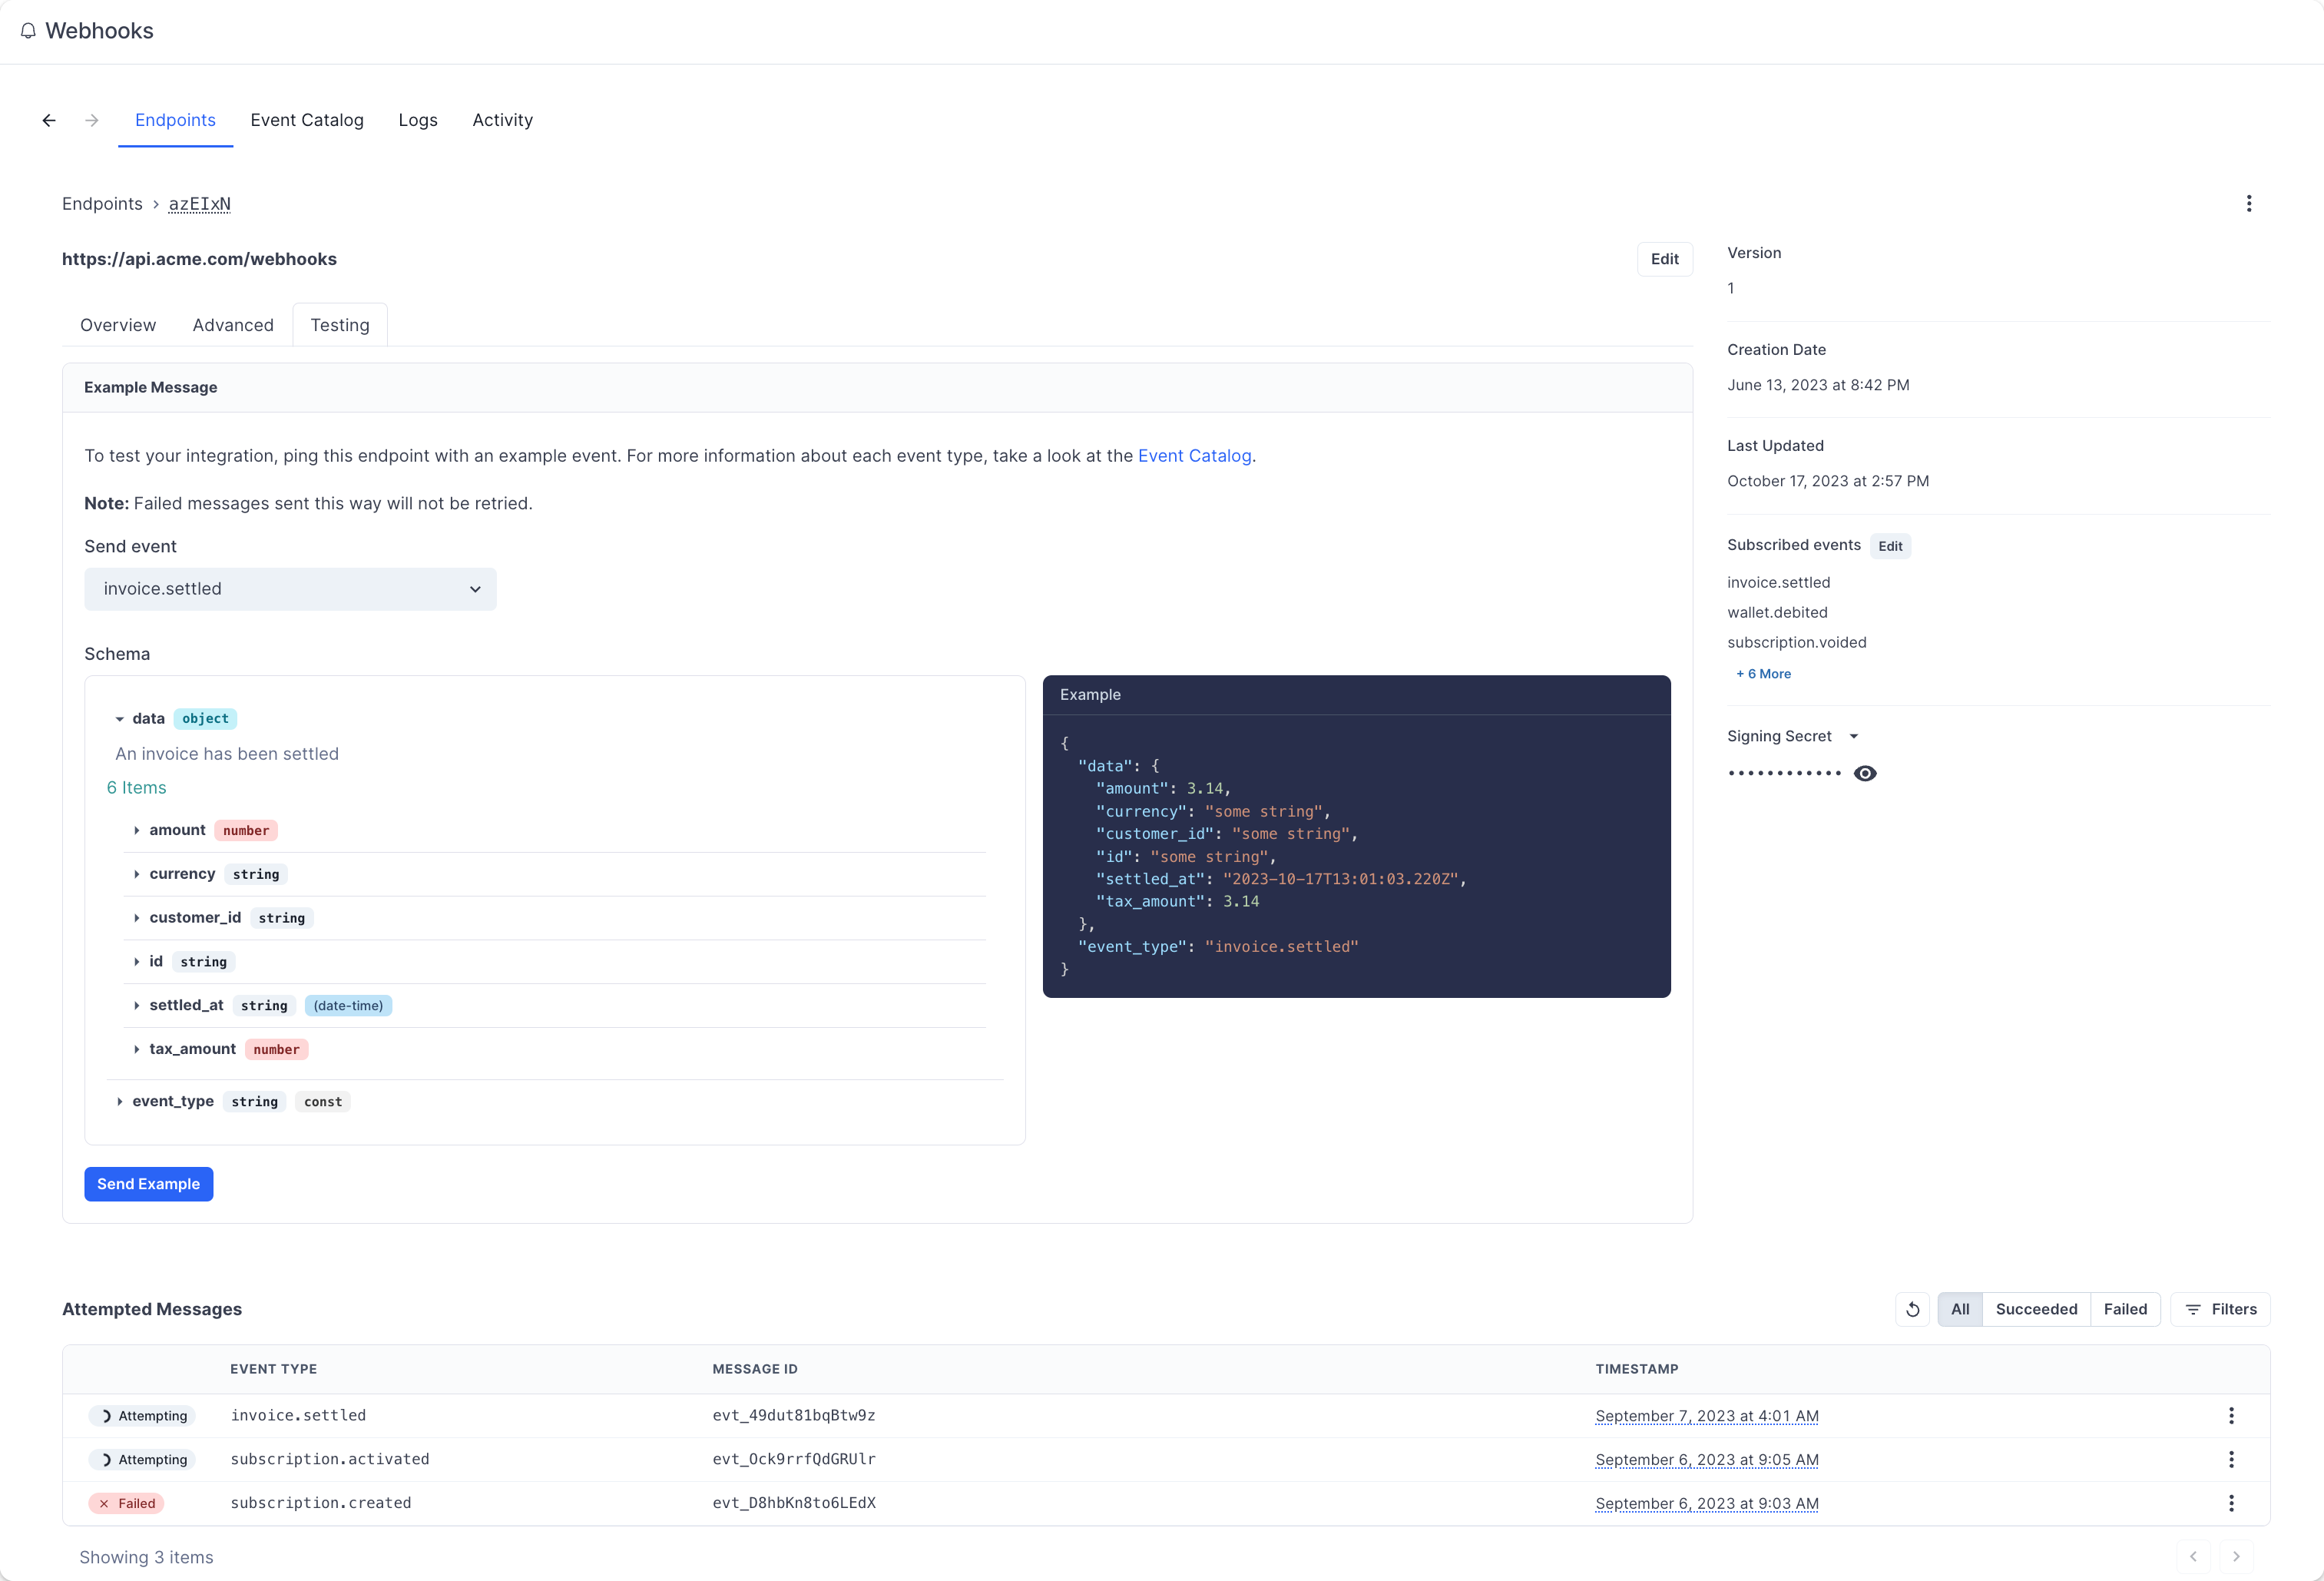 After sending an example event, you can select the message to view the message payload, all of the message attempts, and whether it succeeded or failed.
Additionally, the **Logs** section gives you a complete view of past call attempts with their date, status, and payload.
## Event delivery
### Replaying events
To replay one or more events, find the message in the UI, open the options menu next to any of the attempts, and select **Resend**.
This is useful if your service had downtime or if your endpoint was misconfigured.
### Retry schedule
Hyperline attempts each message based on the following schedule. Each period starts after the preceding attempt fails:
* Immediately
* 5 seconds
* 5 minutes
* 30 minutes
* 2 hours
* 5 hours
* 10 hours
* 10 hours (in addition to the previous)
If you remove or disable an endpoint, Hyperline also stops delivery attempts to that endpoint.
### Event ordering
Hyperline doesn't guarantee delivery of events in the order in which they're generated. You can find more details about why guaranteeing order doesn't really work in [this article](https://www.svix.com/blog/guaranteeing-webhook-ordering).
Your endpoint shouldn't expect delivery of events in a specific order. Design your system so that it doesn't require ordering. You can also use the API to fetch any missing objects. For example, you can fetch the subscription details using the ID provided in the `subscription.created` event payload.
### Static source IP addresses
In case your webhook receiving endpoint is behind a firewall or NAT, you may need to allow traffic from the static IP addresses of Hyperline's webhook servers.
In such scenarios, whitelist the following IP addresses:
```
52.215.16.239
54.216.8.72
63.33.109.123
2a05:d028:17:8000::/56
```
## Best practices
### Handle duplicate events
Webhook endpoints might occasionally receive the same event more than once. You can guard against duplicated event receipts by making your event processing [idempotent](https://en.wikipedia.org/wiki/Idempotence). One way of doing this is logging the events you've processed, and then not processing already-logged events.
### Prevent stale data
Because Hyperline can retry webhooks, another update can occur once your server is finally able to process the event. Therefore, query the latest version of the related entity upon receiving a webhook.
### Verify webhooks
Verifying webhooks is an important part of consuming them. Because of the way webhooks work, attackers can impersonate services by simply sending a fake webhook to an endpoint. This is a potential security hole for your application.
To prevent this, Hyperline **signs** every webhook and its metadata with a unique key for each endpoint. You can then use this signature to verify the webhook indeed comes from Hyperline, and only process it if it does.
Another potential security hole is what's called replay attacks. A replay attack is when an attacker intercepts a valid payload (including the signature), and re-transmits it to your endpoint. This payload passes signature validation, so your endpoint acts on it.
To mitigate this attack, Hyperline includes a timestamp (`webhook-timestamp` header) in every request that indicates when the webhook attempt occurred. Reject webhooks with a timestamp that is more than five minutes away (past or future) from the current time.
**Verifying signatures**
Each webhook call includes three headers with additional information that you use for verification:
* `webhook-id`: the unique message identifier for the webhook message. This identifier is unique across all messages but stays the same when Hyperline resends the same webhook (e.g. due to a previous failure).
* `webhook-timestamp`: timestamp in seconds since epoch.
* `webhook-signature`: the Base64 encoded list of signatures (space delimited).
**Constructing the signed content**
To build the content to sign, concatenate the id, timestamp, and payload, separated by the full-stop character (`.`). In code, it will look something like:
```
signedContent = "${webhook_id}.${webhook_timestamp}.${body}"
```
Where `body` is the raw body of the request. The signature is sensitive to any change. Even a small change in the body produces a completely different signature, so don't change the body in any way before verifying.
**Determining the expected signature**
Hyperline uses `HMAC` with `SHA-256` to sign webhooks.
To calculate the expected signature, HMAC the `signed_content` from above using the base64 portion of your signing secret as the key. This is the part after the `whsec_` prefix. For example, given the secret `whsec_MfKQ9r8GKYqrTwjUPD8ILPZIo2LaLaSw` you will want to use `MfKQ9r8GKYqrTwjUPD8ILPZIo2LaLaSw`.
Here is an example of how you can calculate the signature in Node.js:
```js theme={null}
const crypto = require("crypto");
const signedContent = `${webhook_id}.${webhook_timestamp}.${body}`;
const secret = "whsec_MfKQ9r8GKYqrTwjUPD8ILPZIo2LaLaSw";
// Need to base64 decode the secret
const secretBytes = new Buffer(secret.split("_")[1], "base64");
const signature = crypto
.createHmac("sha256", secretBytes)
.update(signedContent)
.digest("base64");
console.log(signature);
```
This generated signature should match one of the ones sent in the `webhook-signature` header.
This header contains a list of space-delimited signatures and their corresponding version identifiers. The signature list is most commonly of length one, though there could be any number of signatures. For example:
```
v1,g0hM9SsE+OTPJTGt/tmIKtSyZlE3uFJELVlNIOLJ1OE= v1,bm9ldHUjKzFob2VudXRob2VodWUzMjRvdWVvdW9ldQo= v2,MzJsNDk4MzI0K2VvdSMjMTEjQEBAQDEyMzMzMzEyMwo=
```
Make sure to remove the version prefix and delimiter (e.g. v1,) before verifying the signature.
This documentation is built and hosted on [Mintlify](https://mintlify.com), a developer documentation platform.
After sending an example event, you can select the message to view the message payload, all of the message attempts, and whether it succeeded or failed.
Additionally, the **Logs** section gives you a complete view of past call attempts with their date, status, and payload.
## Event delivery
### Replaying events
To replay one or more events, find the message in the UI, open the options menu next to any of the attempts, and select **Resend**.
This is useful if your service had downtime or if your endpoint was misconfigured.
### Retry schedule
Hyperline attempts each message based on the following schedule. Each period starts after the preceding attempt fails:
* Immediately
* 5 seconds
* 5 minutes
* 30 minutes
* 2 hours
* 5 hours
* 10 hours
* 10 hours (in addition to the previous)
If you remove or disable an endpoint, Hyperline also stops delivery attempts to that endpoint.
### Event ordering
Hyperline doesn't guarantee delivery of events in the order in which they're generated. You can find more details about why guaranteeing order doesn't really work in [this article](https://www.svix.com/blog/guaranteeing-webhook-ordering).
Your endpoint shouldn't expect delivery of events in a specific order. Design your system so that it doesn't require ordering. You can also use the API to fetch any missing objects. For example, you can fetch the subscription details using the ID provided in the `subscription.created` event payload.
### Static source IP addresses
In case your webhook receiving endpoint is behind a firewall or NAT, you may need to allow traffic from the static IP addresses of Hyperline's webhook servers.
In such scenarios, whitelist the following IP addresses:
```
52.215.16.239
54.216.8.72
63.33.109.123
2a05:d028:17:8000::/56
```
## Best practices
### Handle duplicate events
Webhook endpoints might occasionally receive the same event more than once. You can guard against duplicated event receipts by making your event processing [idempotent](https://en.wikipedia.org/wiki/Idempotence). One way of doing this is logging the events you've processed, and then not processing already-logged events.
### Prevent stale data
Because Hyperline can retry webhooks, another update can occur once your server is finally able to process the event. Therefore, query the latest version of the related entity upon receiving a webhook.
### Verify webhooks
Verifying webhooks is an important part of consuming them. Because of the way webhooks work, attackers can impersonate services by simply sending a fake webhook to an endpoint. This is a potential security hole for your application.
To prevent this, Hyperline **signs** every webhook and its metadata with a unique key for each endpoint. You can then use this signature to verify the webhook indeed comes from Hyperline, and only process it if it does.
Another potential security hole is what's called replay attacks. A replay attack is when an attacker intercepts a valid payload (including the signature), and re-transmits it to your endpoint. This payload passes signature validation, so your endpoint acts on it.
To mitigate this attack, Hyperline includes a timestamp (`webhook-timestamp` header) in every request that indicates when the webhook attempt occurred. Reject webhooks with a timestamp that is more than five minutes away (past or future) from the current time.
**Verifying signatures**
Each webhook call includes three headers with additional information that you use for verification:
* `webhook-id`: the unique message identifier for the webhook message. This identifier is unique across all messages but stays the same when Hyperline resends the same webhook (e.g. due to a previous failure).
* `webhook-timestamp`: timestamp in seconds since epoch.
* `webhook-signature`: the Base64 encoded list of signatures (space delimited).
**Constructing the signed content**
To build the content to sign, concatenate the id, timestamp, and payload, separated by the full-stop character (`.`). In code, it will look something like:
```
signedContent = "${webhook_id}.${webhook_timestamp}.${body}"
```
Where `body` is the raw body of the request. The signature is sensitive to any change. Even a small change in the body produces a completely different signature, so don't change the body in any way before verifying.
**Determining the expected signature**
Hyperline uses `HMAC` with `SHA-256` to sign webhooks.
To calculate the expected signature, HMAC the `signed_content` from above using the base64 portion of your signing secret as the key. This is the part after the `whsec_` prefix. For example, given the secret `whsec_MfKQ9r8GKYqrTwjUPD8ILPZIo2LaLaSw` you will want to use `MfKQ9r8GKYqrTwjUPD8ILPZIo2LaLaSw`.
Here is an example of how you can calculate the signature in Node.js:
```js theme={null}
const crypto = require("crypto");
const signedContent = `${webhook_id}.${webhook_timestamp}.${body}`;
const secret = "whsec_MfKQ9r8GKYqrTwjUPD8ILPZIo2LaLaSw";
// Need to base64 decode the secret
const secretBytes = new Buffer(secret.split("_")[1], "base64");
const signature = crypto
.createHmac("sha256", secretBytes)
.update(signedContent)
.digest("base64");
console.log(signature);
```
This generated signature should match one of the ones sent in the `webhook-signature` header.
This header contains a list of space-delimited signatures and their corresponding version identifiers. The signature list is most commonly of length one, though there could be any number of signatures. For example:
```
v1,g0hM9SsE+OTPJTGt/tmIKtSyZlE3uFJELVlNIOLJ1OE= v1,bm9ldHUjKzFob2VudXRob2VodWUzMjRvdWVvdW9ldQo= v2,MzJsNDk4MzI0K2VvdSMjMTEjQEBAQDEyMzMzMzEyMwo=
```
Make sure to remove the version prefix and delimiter (e.g. v1,) before verifying the signature.
This documentation is built and hosted on [Mintlify](https://mintlify.com), a developer documentation platform.